
TLDR
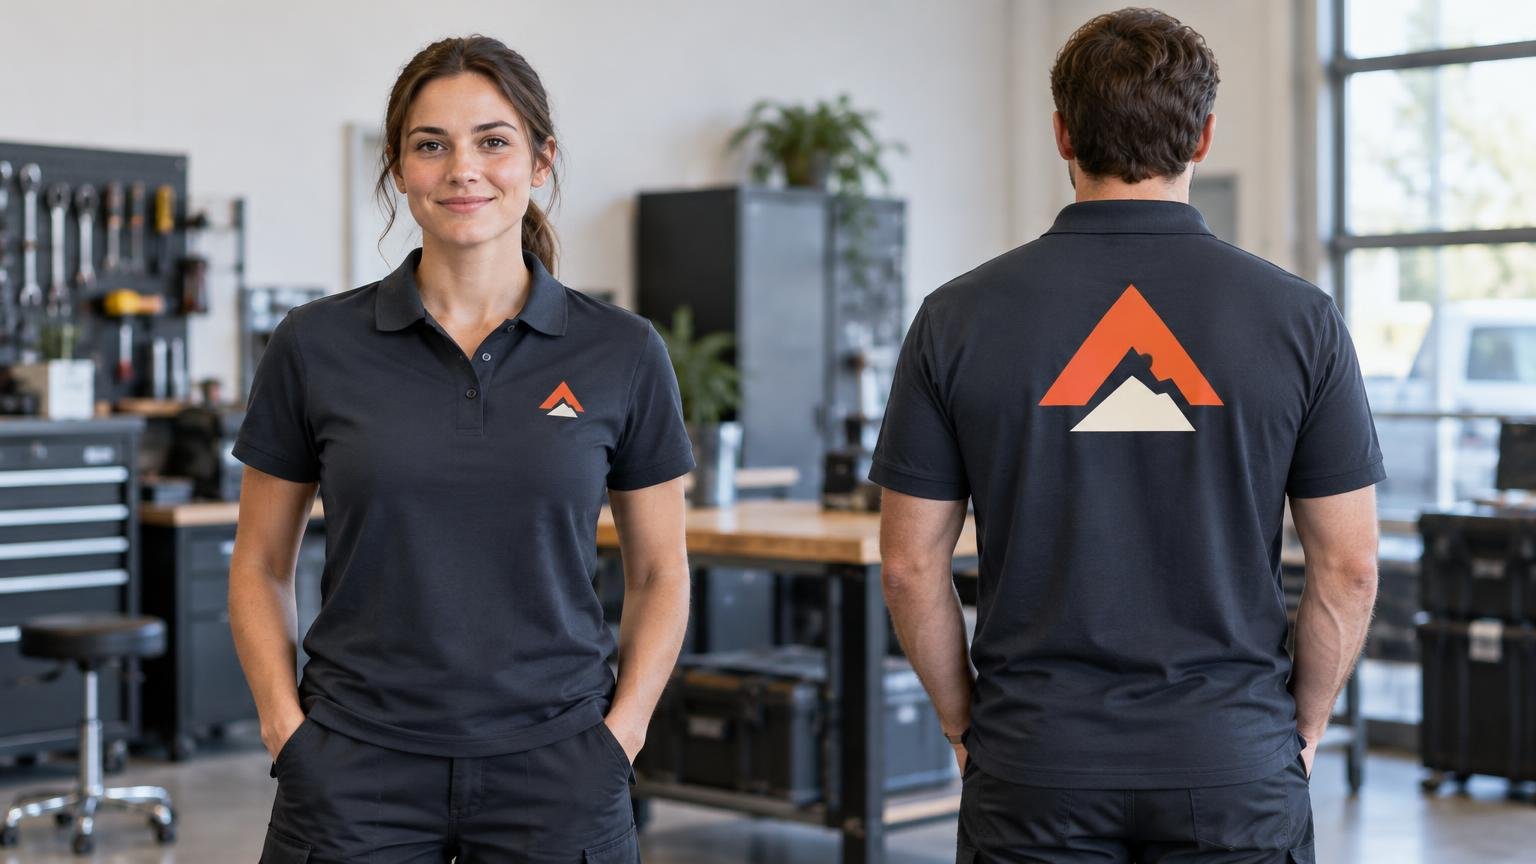
For the front vs back logo employee uniforms decision, use a front logo when face-to-face identification matters, a back logo when people need to recognize employees from behind or at a distance, and both when the job requires both kinds of visibility. A small left-chest mark is the safest general-purpose choice for customer-facing uniforms. A larger upper-back or full-back design is more useful for field crews, delivery teams, event staff, and employees moving through busy spaces.
Do not choose placement by appearance alone. Consider viewing distance, employee role, garment construction, decoration method, comfort, and future reorders. Treat published dimensions as starting points, then approve the design on the exact garment style and representative sizes because usable decoration areas vary by garment, size, process, and equipment.
Front vs back logos at a glance
| Work context | Recommended placement | Why it works |
|---|---|---|
| Reception, retail, and front-of-house hospitality | Front, usually left chest | Customers see the identity during face-to-face conversations without the uniform feeling promotional. |
| Restaurant back-of-house or facilities staff | Front, back, or both according to identification needs | A front mark provides basic identity; a back mark can help supervisors or coworkers identify staff in active areas. |
| Mobile service and installation crews | Front and back | The front looks professional at the door, while the back remains visible when the employee turns toward the job. |
| Delivery and field teams | Back or both | A larger back treatment is easier to recognize as the employee approaches, carries items, or works facing away. |
| Event staff and crowd assistance | Both | The front supports direct interaction and the back helps attendees find staff in a crowd. |
| Office staff wearing occasional branded polos | Front only | A restrained chest logo usually provides enough identity without dominating the garment. |
| Safety-sensitive roadside or work-zone roles | Only after garment-specific safety review | Branding must not interfere with required high-visibility materials, protective construction, or applicable workplace rules. |
These are operating defaults rather than universal rules. A premium hotel may prefer a discreet front mark, while an event contractor may need large STAFF identification across the back. Start with how people encounter the employee, not with how much blank fabric appears available.
When a front logo is the better choice
A front logo works best when employees are usually seen at conversational distance. It identifies the company while the wearer greets a customer, stands at a counter, enters a home, or participates in a meeting. It also leaves most of the garment visually quiet, which suits polos, woven work shirts, and more formal service uniforms.
The left chest is the usual default because it is visible without occupying the center of the shirt. STAHLS placement references describe a general 5-by-5-inch left-chest imprint area. In practice, the artwork often needs to be smaller than the entire available zone so it does not crowd a placket, pocket, armhole, or seam. A long horizontal company name and a compact square emblem will require different dimensions even when both occupy the same general location.
Measure from garment reference points
Avoid specifying placement with an instruction such as “put it over the heart.” That phrase is open to interpretation and becomes unreliable across polos, T-shirts, jackets, and different sizes. STAHLS guidance for polos uses the shoulder seam and placket as reference points, placing decoration approximately 7.5–9 inches below the shoulder seam and 4–6 inches from center. These figures are production starting points, not a substitute for a garment proof.
Before approval, check whether the design conflicts with a pocket, zipper, princess seam, ventilation panel, color-block insert, or reinforced area. Decide whether a pocket logo should sit above the pocket, be centered on it, or move to the opposite chest. For a broader look at the available locations, see this guide to company logo placement on work shirts.
When an upper-back or full-back logo makes more sense
A back logo earns its space when recognition from behind or across a room matters more than subtle presentation. It is especially useful for technicians working with their backs to customers, crews moving around a property, delivery staff carrying packages, and event employees who need to be found quickly.
An upper-back design and a full-back design solve different problems. An upper-back mark provides visible identification while remaining relatively restrained. Placement references show approximately 8 by 8 inches as an upper- or medium-back zone. A typical adult full-back maximum zone may extend to roughly 12 by 14 inches, subject to the shirt, size, seams, and equipment. Do not automatically fill the maximum area; use only the size required for the desired viewing distance and message.
Keep the back message simple. A company name, department, service category, or functional identifier such as EVENT STAFF usually reads more effectively than a dense collection of contact details. Fine lines and small wording that look acceptable on a monitor may become difficult to read once the shirt bends, folds, or is viewed while the employee moves.
When to put logos on both front and back
Use both placements when employees need close-range identity and distance recognition. The two decorations should have separate jobs: the front identifies the organization during direct interaction, while the back provides a larger company name, department, or role marker.
This arrangement is practical for home-service technicians, mobile maintenance crews, security teams, delivery staff, and event workers. It can also increase cost, production complexity, and the number of details that must match on reorders. Do not add a second location merely because the garment has empty space.
- Choose front only when a restrained, customer-facing presentation is sufficient.
- Choose back only when distance recognition is the dominant need and front identification adds little value.
- Choose both when employees regularly alternate between direct interaction and working with their backs turned.
- Use role-specific layouts only when the operational benefit outweighs the added inventory and reorder complexity.
Match the decoration method to the placement
Placement and decoration method should be planned together. Embroidery uses digitized artwork and stitch settings to build the design with thread, making it a common fit for compact chest marks on polos, woven shirts, and jackets. Screen printing pushes ink through a stenciled screen and cures it, which can suit larger back graphics when the garment and order support the process.
Heat-transfer processes apply graphics with heat and pressure. Manufacturer education materials identify uses including variable names or numbers, performance apparel, and small or large quantities. That flexibility can be useful when employees need individual names, departments, or role identifiers. Dye sublimation also uses heat and pressure to transfer a design, but garment compatibility and fabric composition must be confirmed.
Do not assume every polyester shirt can receive the same ink, transfer, temperature, or dwell time. SanMar cautions that polyester and polyester blends can require low-cure inks and bleed-control practices in screen printing. Fabric choice affects decoration as well as wearer comfort, so compare polyester and cotton work shirts before locking the artwork and process.
Color also changes the production specification. Light artwork on dark garments may require an underbase or another opacity strategy, while a full-color logo may reproduce differently in thread, ink, and transfer film. Review the practical differences between one-color and full-color uniform logos before approving a system that must remain consistent for years.
Do not force one layout onto every garment
A logo can have the same visual priority across a polo, T-shirt, jacket, and hoodie without using identical measurements. Plackets, pockets, zippers, hoods, yokes, insulation, and seams change the usable space. STAHLS jacket guidance places the design center about 6–9 inches below the collar seam but notes that garment construction can require adjustment.
Create approved versions rather than improvising each order. For example, establish a polo left-chest layout, a T-shirt left-chest layout, a jacket layout, and a back layout. Keep the logo proportions and brand colors consistent while allowing placement and size to respond to the garment. The same principle applies across fitted, youth, tall, and extended sizes. For a broader workflow, see how to match logos across polos, T-shirts, hoodies, and jackets.
Take extra care with safety-sensitive workwear
Blank-looking space on protective apparel is not automatically available for decoration. Reflective striping, fluorescent background material, waterproof membranes, flame-resistant construction, seams, labels, and certification markings may all affect what can be added and where.
The OSHA work-zone hazard guidance states that workers exposed to public vehicular traffic must be provided with and wear warning garments made from reflectorized or high-visibility material, and it emphasizes 360-degree visibility. ANSI identifies ANSI/ISEA 107-2020 as addressing design, testing, performance, and labeling criteria for high-visibility safety apparel.
Before decorating high-visibility, flame-resistant, waterproof, or otherwise protective clothing, obtain confirmation for the exact garment and proposed process from the garment manufacturer and a qualified decorator. Also check the employer’s hazard assessment and site requirements. Do not assume that a logo preserves a garment’s rating or compliance merely because it fits between reflective bands.
Build a repeatable logo-placement specification
The most important reorder tool is not the original invoice; it is a written production specification. Record enough information for a future order to reproduce the approved result without relying on memory or vague descriptions.
- Garment manufacturer, style or SKU, color, and approved size range
- Artwork filename and version, including the approved logo lockup
- Front, back, or dual placement for each employee role
- Finished decoration width and height for each garment layout
- Placement reference point, measurement, and permitted tolerance
- Decoration method and any process-specific settings supplied by the decorator
- Approved ink, transfer, or thread colors
- Rules for pockets, plackets, zippers, seams, and alternate garment constructions
- Approved proof or photographed production sample
- Scaling rules for youth, fitted, tall, or extended sizes
- Personalization format for names, numbers, titles, or departments
- Care instructions supplied for the finished garment
Keep one controlled specification rather than allowing departments to reorder from screenshots or old shirts. If a garment is discontinued, approve its replacement as a new layout before placing a large order. Even a similar-looking substitute can position seams, pockets, or plackets differently.
Final recommendation
Use the front as the default for professional, face-to-face identification. Add or substitute a back logo when employees must be recognized from behind or at a distance. Use both only when each location performs a clear operational job.
Before requesting a quote or reorder, prepare quantities by garment and size, employee roles or names, decoration locations, current artwork, required delivery date, and expected future replenishment. Then approve the design on the exact garment rather than treating a generic placement measurement as a finished specification. That final proof is what turns a good-looking first order into a uniform program that can be repeated consistently.